DIY Art Supplies: From Kitchen to Canvas
5 recipes for making homemade, environmentally friendly art supplies.
1/14/20252 min read

Art is a beautiful way to express creativity, and what better way to enhance your artistic journey than by making your own supplies from natural ingredients found right in your kitchen? Creating DIY art supplies not only allows you to explore a range of colors and textures but also saves money and provides an eco-friendly alternative. In this article, we'll explore five easy tutorials for homemade art supplies using ingredients like beet juice for red dyes and turmeric for yellow.
1. Beet Juice for Red Dye
Ingredients
Fresh beets
Water
Instructions:
1. Prepare the Beets: Start by peeling and chopping 2-3 fresh beets into small pieces.
2. Boil: Place the chopped beets in a saucepan with enough water to cover them completely. Bring it to a boil.
3. Simmer & Strain: Reduce the heat and let it simmer for about 30 minutes until the water has turned deep red. Strain out the solids using cheesecloth or a fine mesh sieve.
4. Cool & Store: Allow the liquid dye to cool before transferring it into an airtight container, which can be stored in your refrigerator.
Usage:
This vibrant beet juice can serve as paint when mixed with cornstarch or flour to thicken it up, or diluted with more water if you prefer watercolor effects.
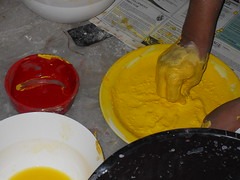
2. Turmeric for Yellow Dye
Ingredients:
Ground turmeric
Water
Instructions:
1. Mix Turmeric & Water: Combine 2 tablespoons of ground turmeric with 1 cup of water in a bowl.
2. Simmer: Pour this mixture into a saucepan and bring it gently to a simmer over low heat, stirring constantly until fully dissolved—about 10 minutes should do.
3. Cool Down: Once cooled, you can strain if desired, though it's unnecessary as ground turmeric will settle on its own.
Usage:
This lively yellow dye works beautifully as paint on paper or canvas! Due to its bright pigmentation, you can also use it directly as watercolor paint.
NOTE: Turmeric is used in many ways, including facial masks, which you should never try. Why? Because when I experimented with this facial that was supposed to make me look beautiful, I resembled Marge Simpson for a week!
3. Homemade Chalk Paint
Ingredients:
Non-toxic school glue (white)
Cornstarch
Food coloring (optional: choose natural options like spinach powder for green)
Instructions:
1. Mix Ingredients: In a bowl, combine equal parts non-toxic glue (½ cup) with cornstarch (½ cup). Add food coloring according to your desired shade—start small!
2. Stir Well: Mix thoroughly until you achieve a smooth consistency without lumps.
3. Transfer: Pour your mixture into containers or old egg cartons for easy organization.
Usage:
This chalk paint is perfect for creating colorful designs on sidewalks or outdoor surfaces!
4. Coffee Paints
Ingredients:
Instant coffee granules
Water
Instructions:
1). Prepare Coffee Mixture: Mix instant coffee granules with warm water at different ratios depending on how dark you'd like each shade—for example, try starting with one tablespoon of coffee per quarter cup of warm water.
2). Stir Until Dissolved: Make sure all granules are dissolved entirely so that there are no gritty bits left behind.
3). Cool Down: Let the mixture cool before utilizing it in artwork!
Usage :
Ideally suited for creating rich browns that work well alongside other natural dyes!
5 . Flour-Based Paper Mache Paste
Ingredients :
All-purpose flour
Water
Instructions:
1 ). Combine equal parts flour (usually one part) and cold tap water in a mixing bowl.
2 ). Whisk together thoroughly, ensuring no lumps remain while achieving desired consistency.
Usage :
Use this paste along strips of newspaper/ cardstock, etc., which creates fun sculptures/paper mache projects without needing toxic adhesives!
Creating these DIY art supplies gives artists access to unique tones while minimizing environmental impact! The process itself encourages experimentation; think beyond traditional mediums.
Making paint is not a new concept; to get a better picture, look at the history of paint.